In this post, I will show you how to setup VPC in AWS console. We will create Virtual Private Cloud environment with the following resources:
- VPC
- Subnets
- NACL
- IGW – Internet Gateway
- Route Table
- EC2
- NAT Gateway
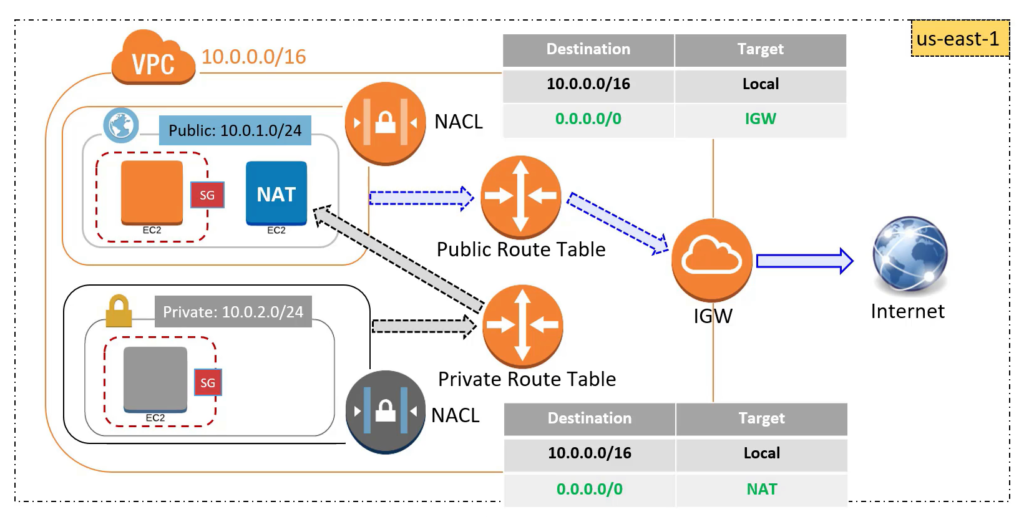
Our VPC architecture in AWS will look like the below diagram:
Step by Step Guide to setup VPC in AWS console:
1. Login to your AWS console. From the AWS console click on Services > Networking & Content Delivery > VPC.
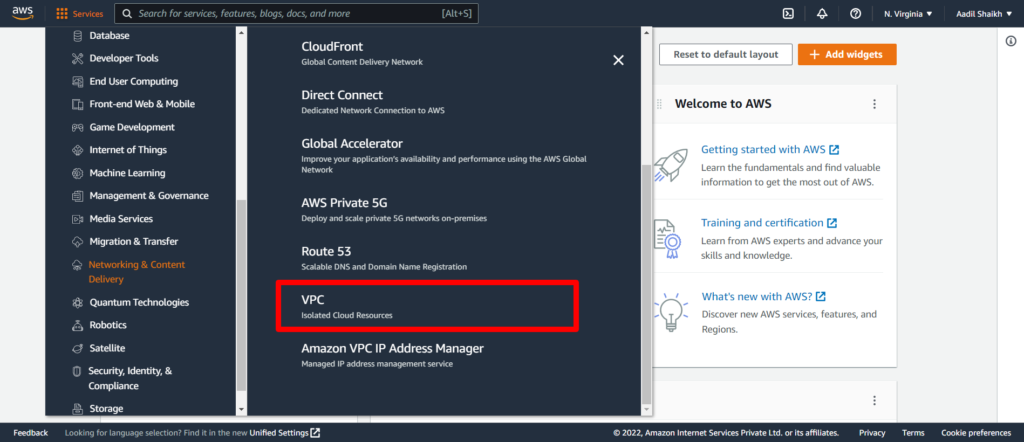
I am creating a VPC in N. Virginia Region. Your region can be different and its completely fine.
2. Click on Your VPCs
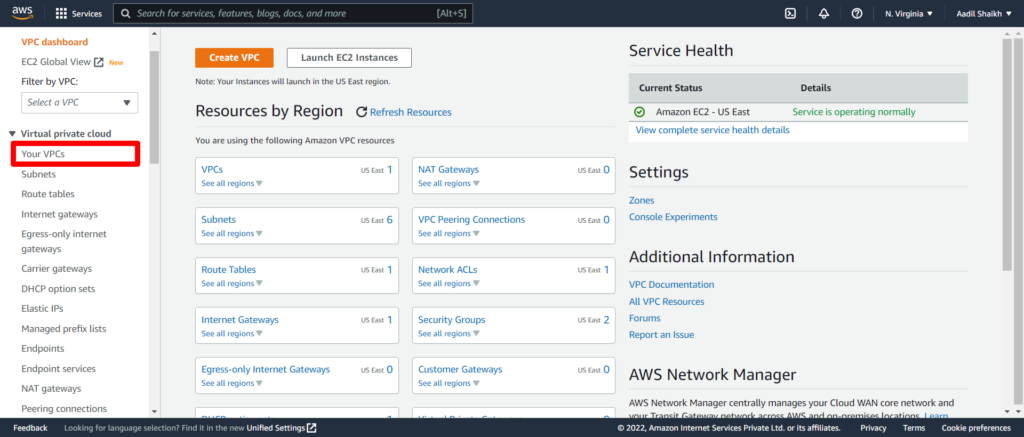
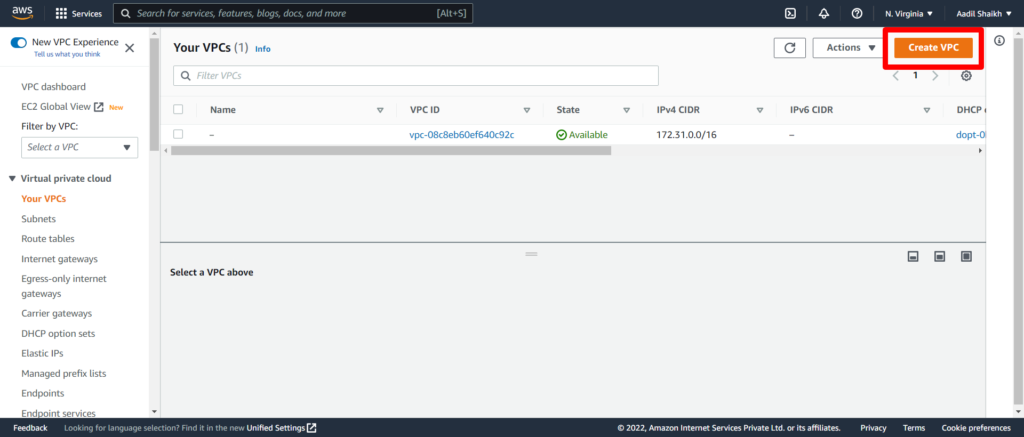
3. You can see your default VPC but we will create a new VPC here. Click on Create VPC.
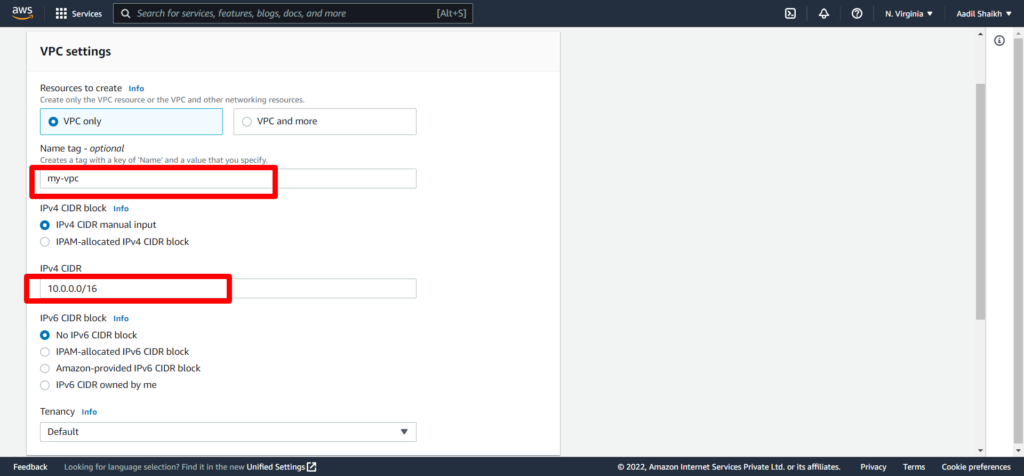
4. Enter the Name Tag my-vpc and Enter IPv4 CIDR as 10.0.0.0/16. Rest other settings will be default. And hit Create VPC button.
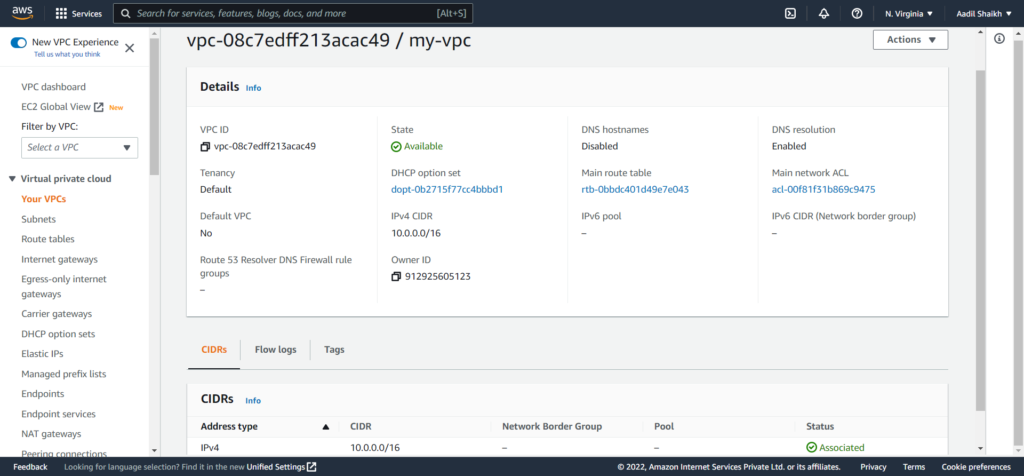
Our VPC is ready.
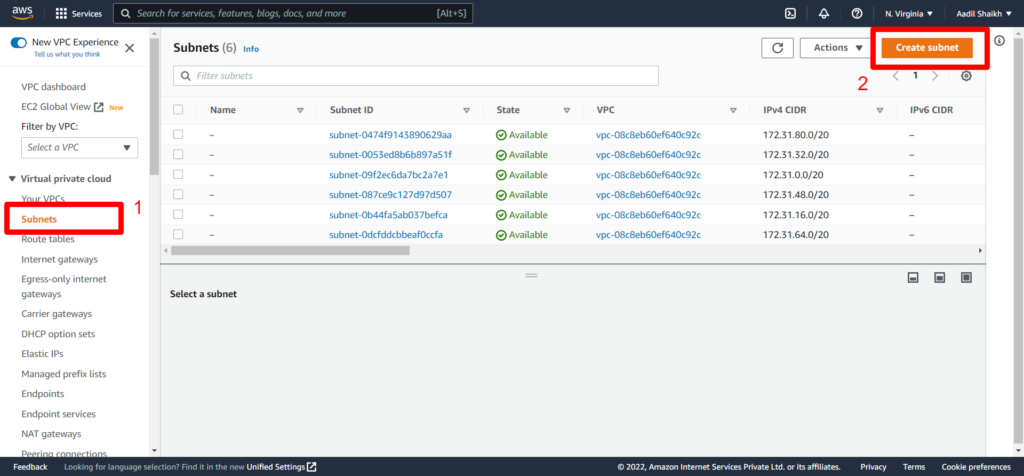
5. Now let go ahead and create subnets. We are going to create 2 subnets as per the architecture diagram. Public Subnet and Private subnet. First lets create a Public Subnet. Click on Subnets from left panel and click Create Subnet.
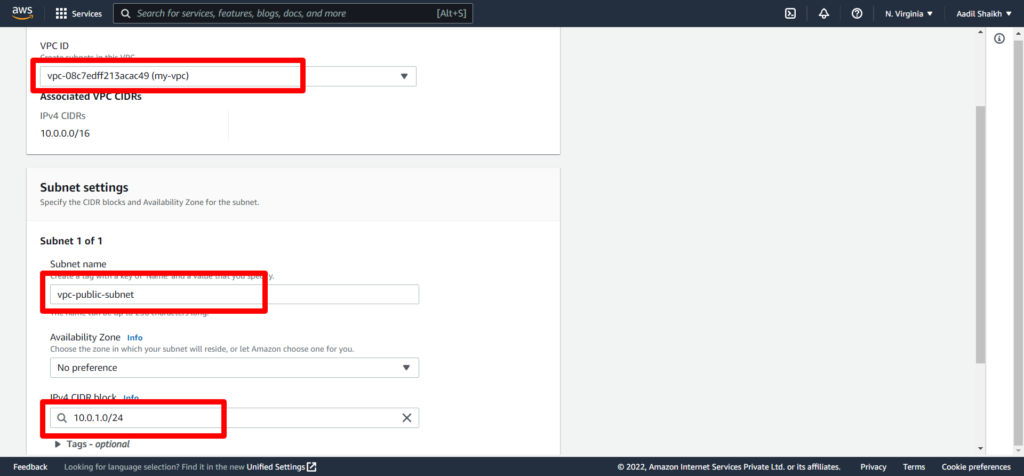
6. Select our newly created VPC (my-vpc) from the drop down. Give a subnet name vpc-public-subnet. And enter IPv4 CIDR block as 10.0.1.0/24. Rest other fields keep it as default and hit create subnet from bottom.

So we have successfully created our public subnet.
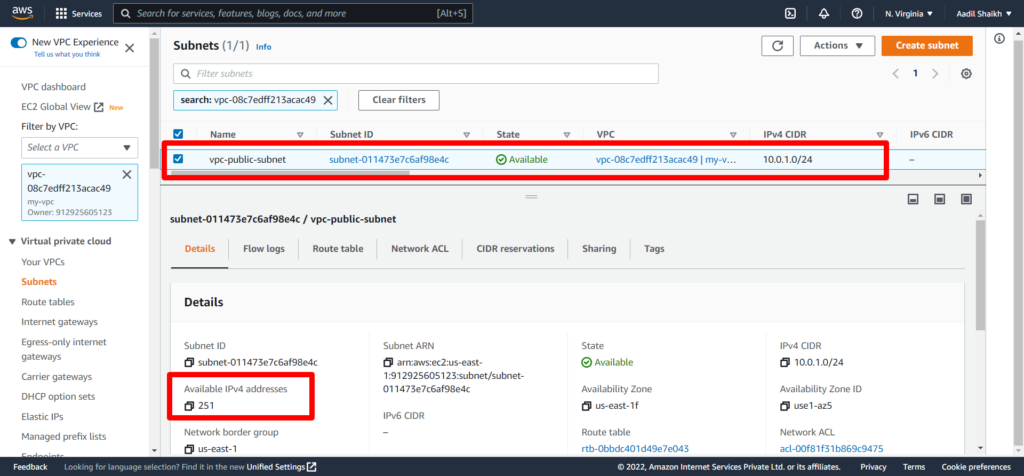

Tip: For this CIDR, AWS has provided 256 Ip addresses. However out of which 5 IP addresses are reserved by AWS and not available for your EC2 instances. Check the image above.
7. Now lets create a private subnet. Click on Create Subnet once again.


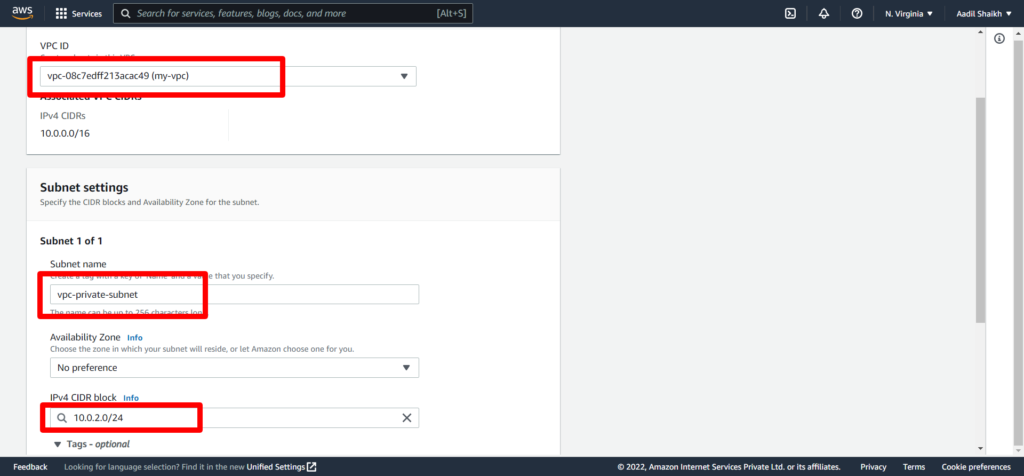
8. Select our VPC (my-vpc) from the drop down. Give a subnet name vpc-private-subnet. And enter IPv4 CIDR block as 10.0.2.0/24. Rest other fields keep it as default and hit create subnet from bottom.

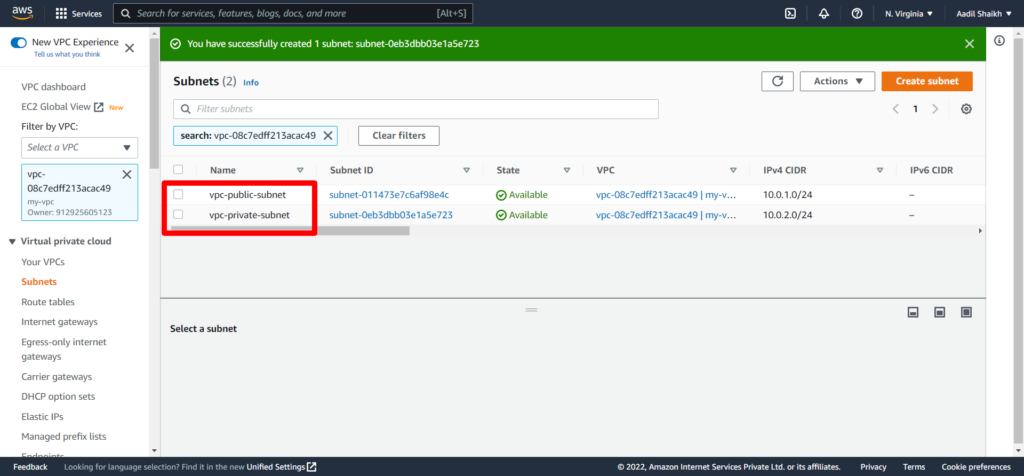
Our public and private subnets are now created.

9. Now lets go ahead and create Network Access Control Lists (NACLs) for our subnets. We are creating 2 NACLs one for Public subnet and another for Private Subnet. Fist lets create a NACL for Public Subnet.
From left panel, click on Network ACLs and click on Create network ACL.
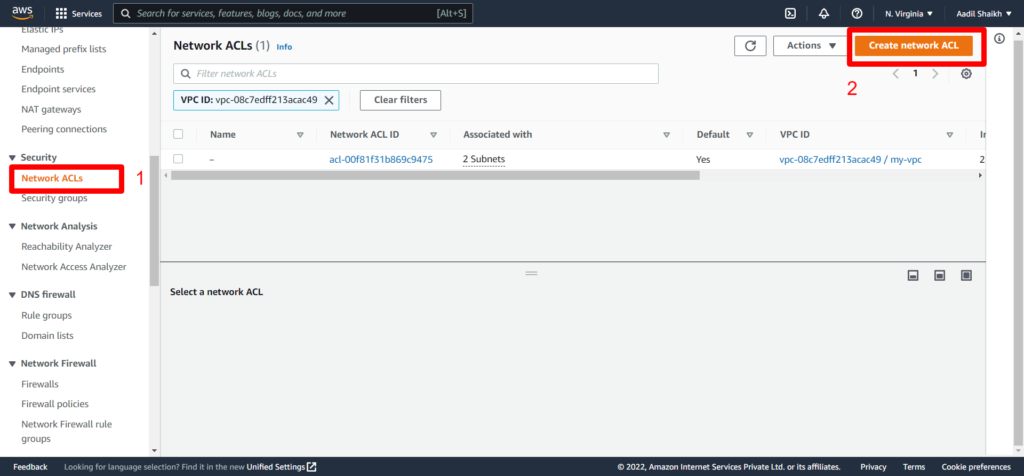

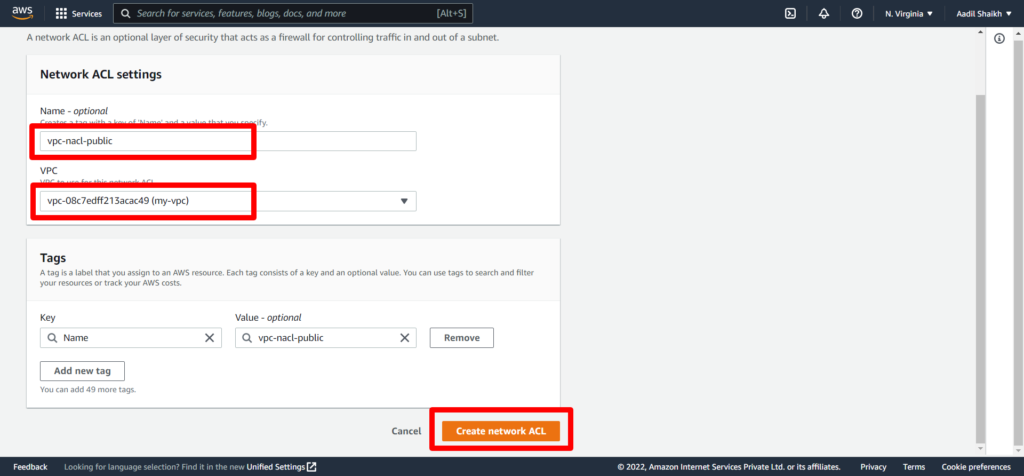
10. Enter the Name vpc-nacl-public, select our VPC (my-vpc) and hit Create Network ACl.

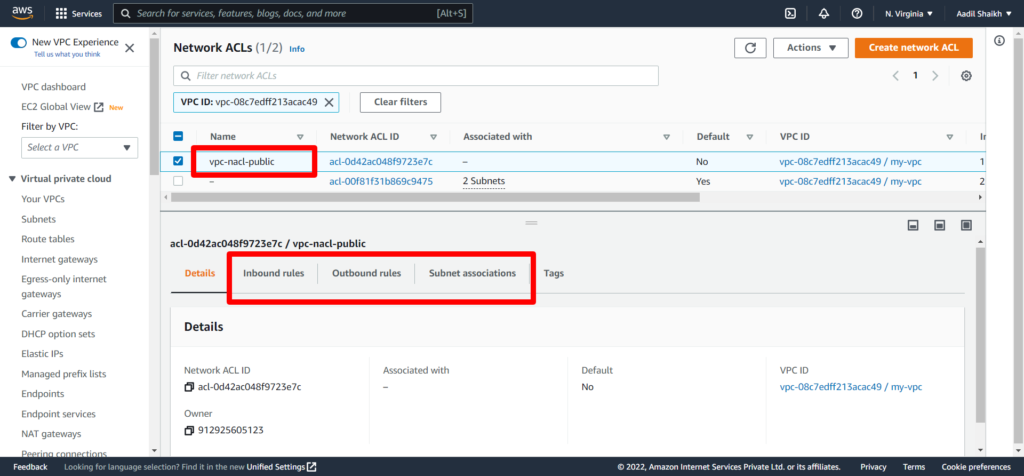
After successful creation of public NACL you will see different options like Inbound Rules, Outbound Rules, Subnet Association.

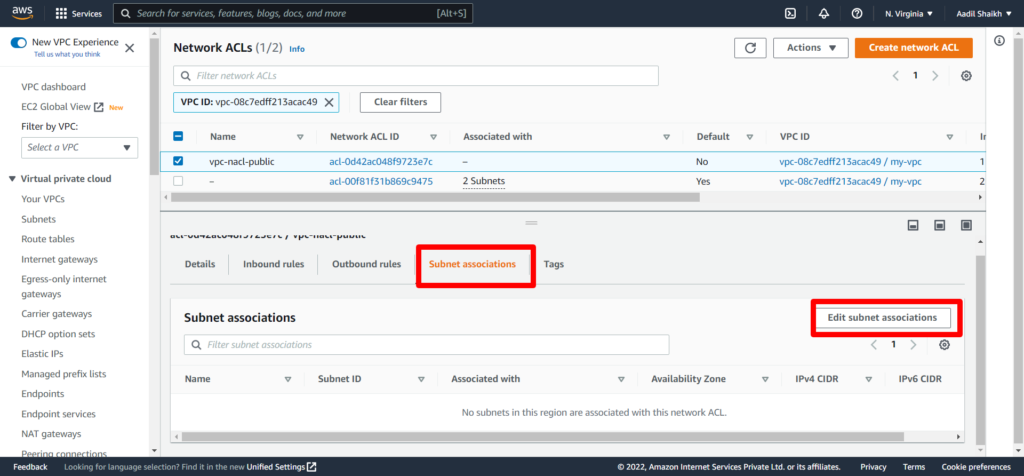
11. Lets associate our vpc-public-subnet to vpc-nacl-public. Click on Subnet Associaltions and then click Edit subnet associations.

12. Select Public subnet and save changes.
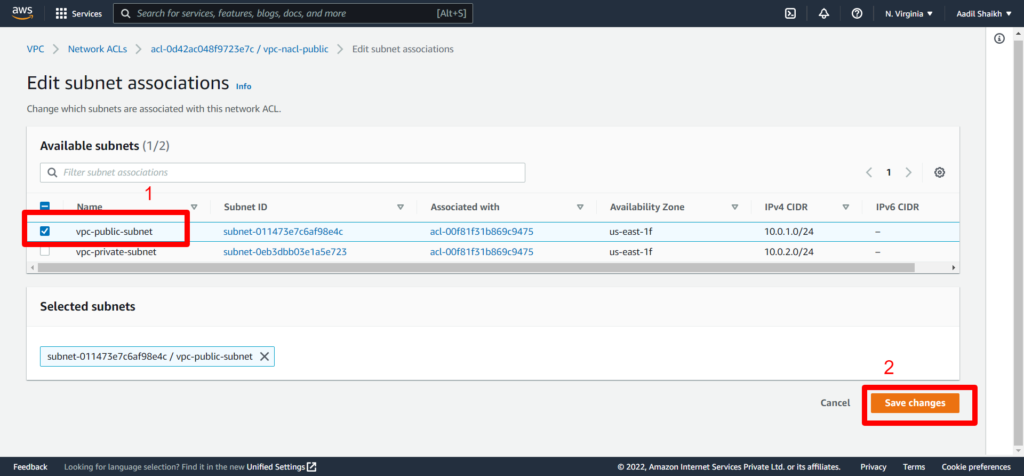

You can notice that NACLs can span multiple subnets in one NACL. So multiple subnets can be under one NACL however for this example we are creating it separate because we only want to give internet access to public subnet.
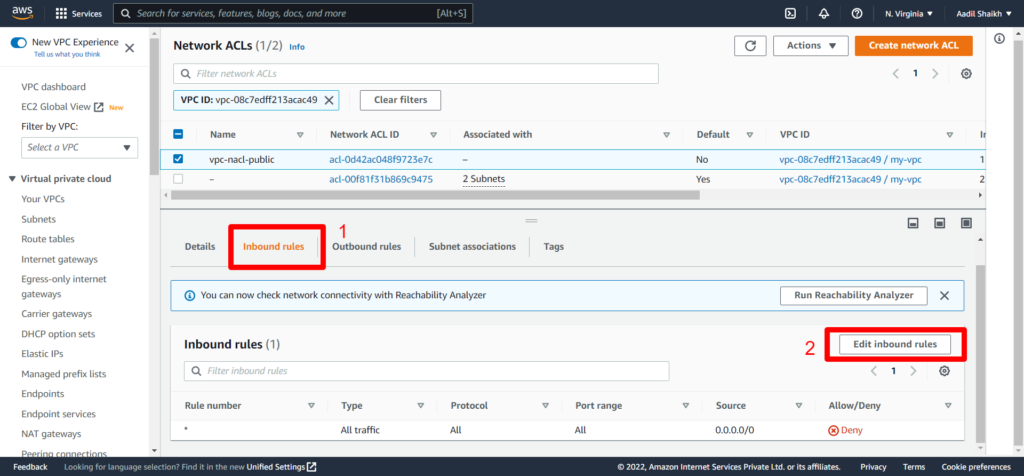
13. Now go to Inbound Rules and click on Edit Inbound rules. You can see that by default the inbound traffic is DENY

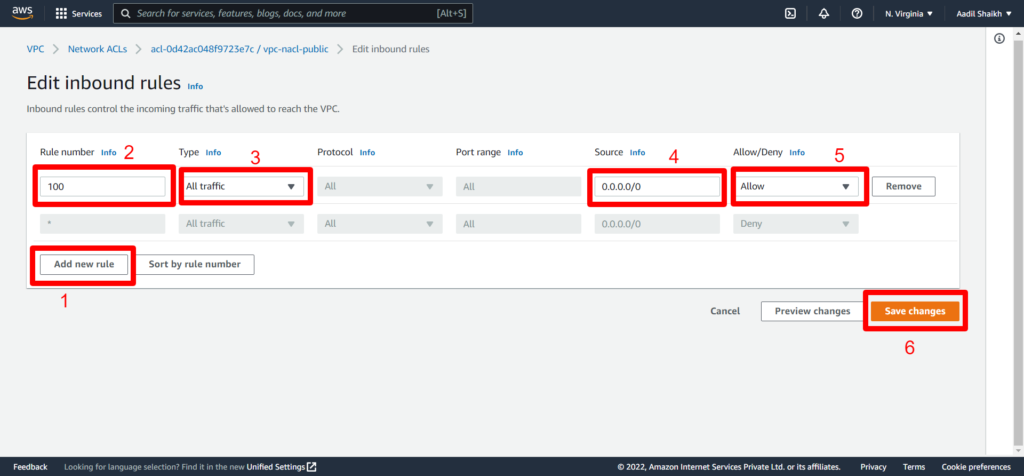
14. Click on Add new rule > Then enter any rule no. > Select All traffic > source as 0.0.0.0/0 > select Allow > save rule.

Since NACLs are Stateless we have to define the Outbound rules explicitly.
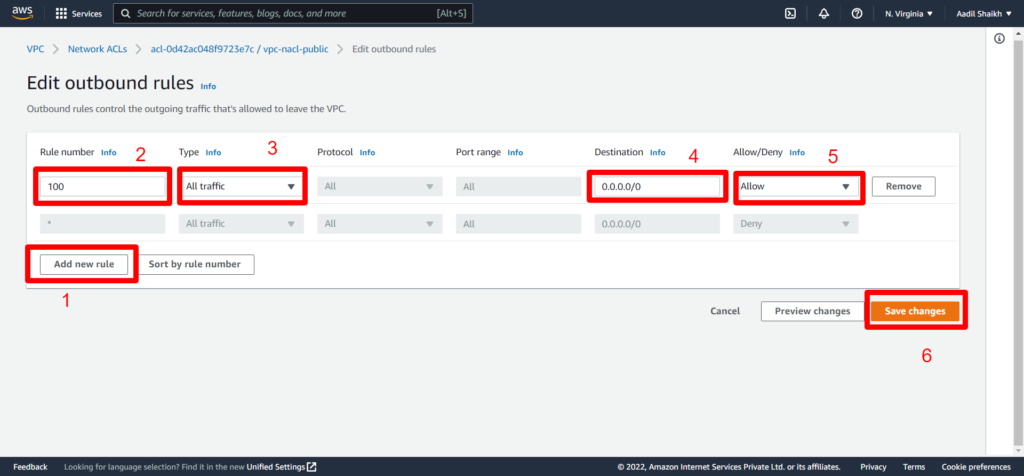
15. Click on Outbound rules > Edit Outbount rules
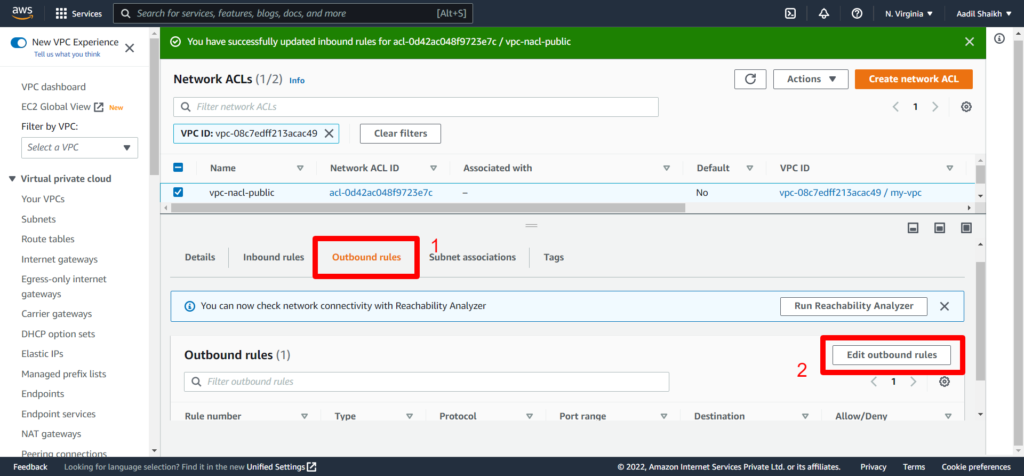

16. Add rules similar to inbound rules

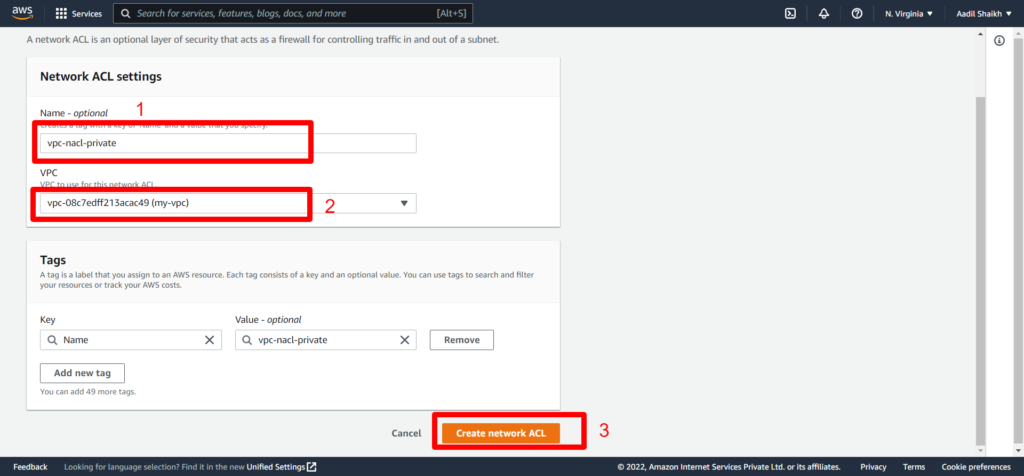
17. Now similarly we will create another NACL for Private Subnet

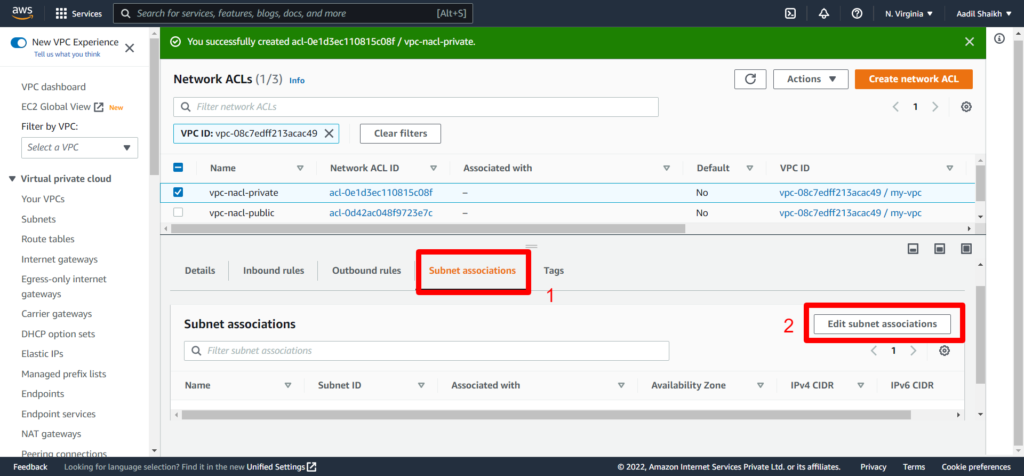
18. Associate Private subnet to our private NACL

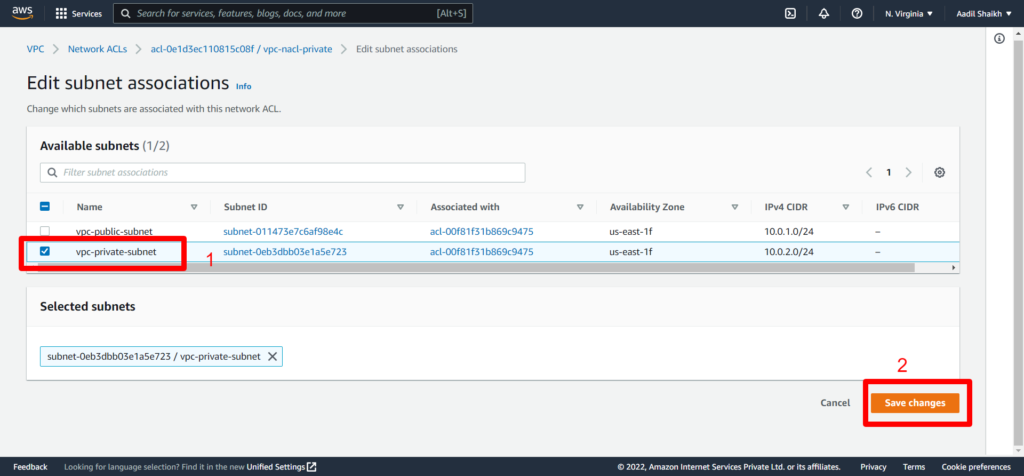
19. Select Private Subnet this time and save

20. Once the private subnet is associated it is time to create inbound and outbound rules similar to public nacl that we have done in previous steps. Follow the screenshots.
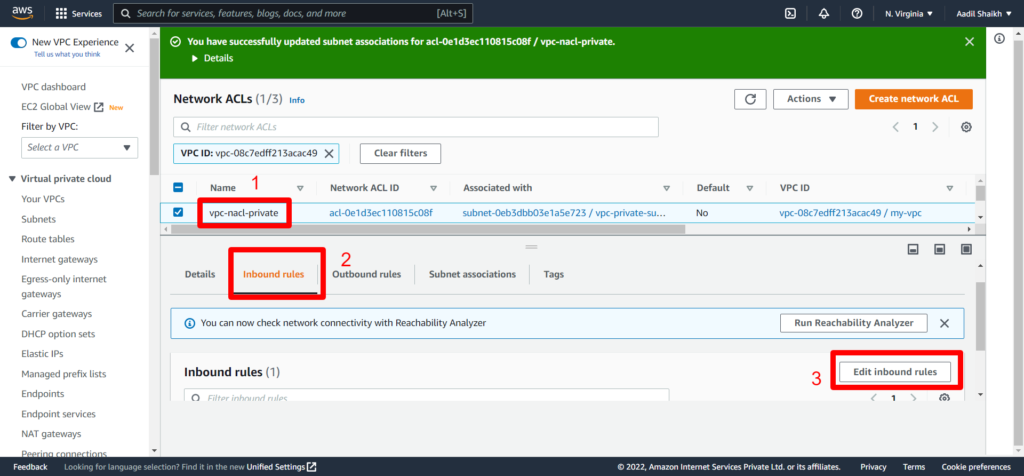

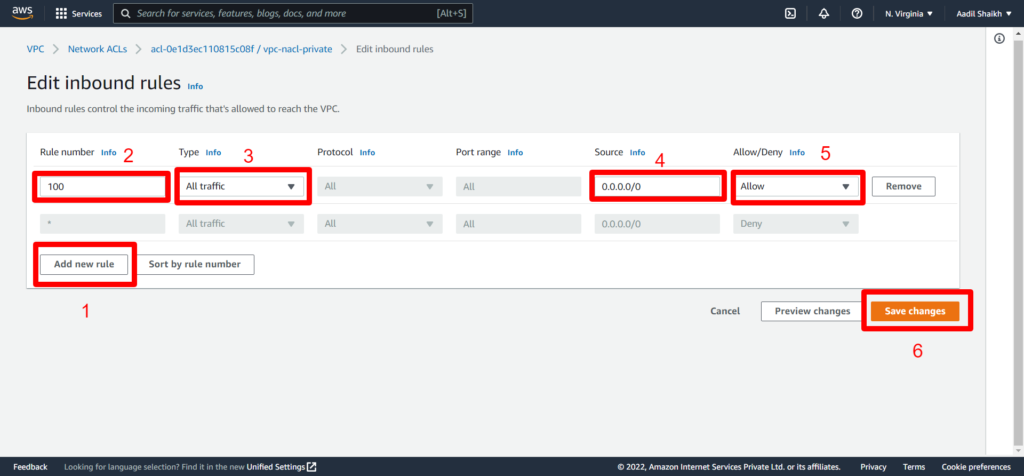

21. Now outbound rules.
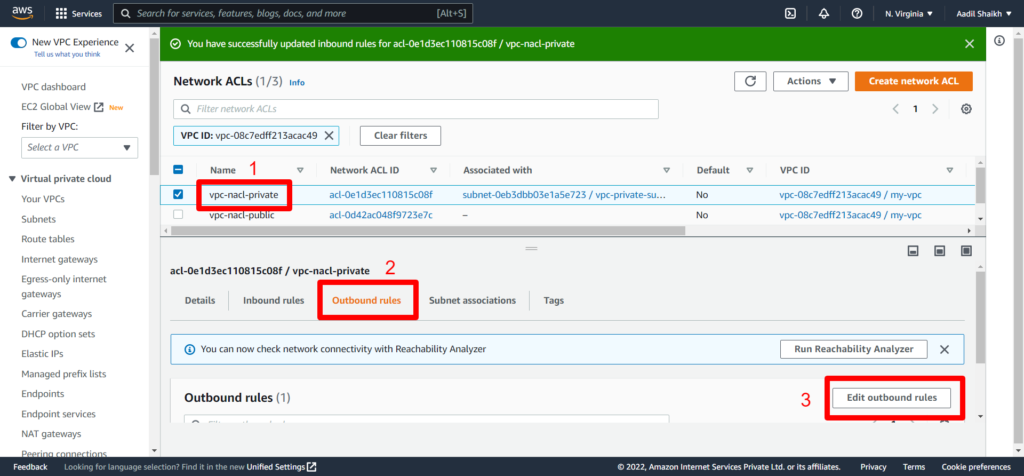

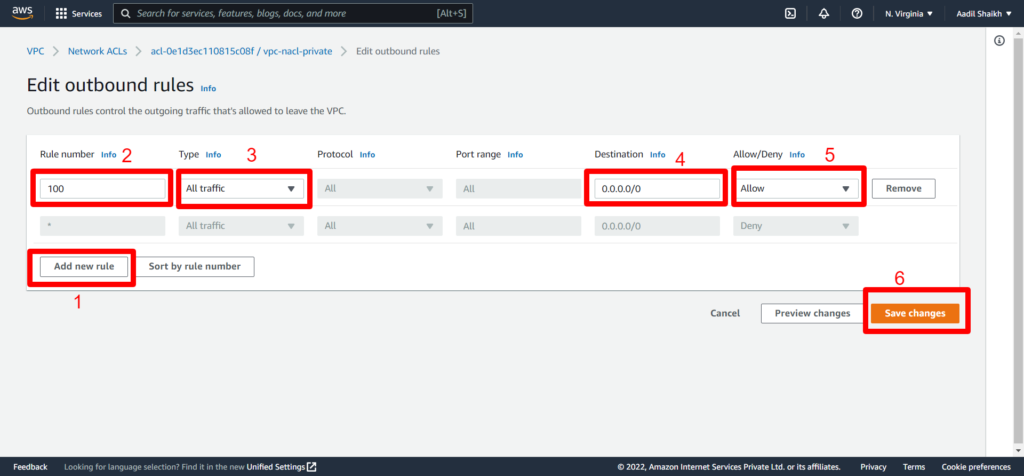

22. Now lets create an Internet Gateway IGW so that we can access internet and attach it to our VPC. Follow the steps from the screenshots.
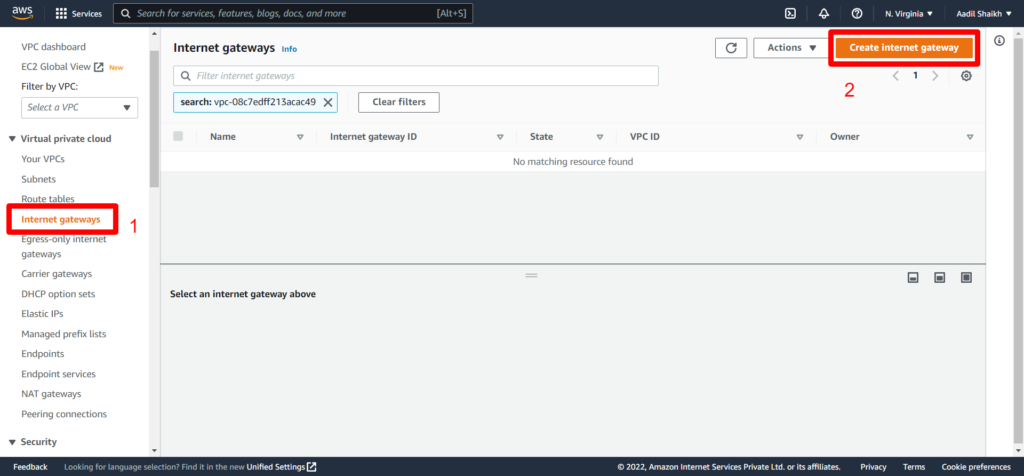

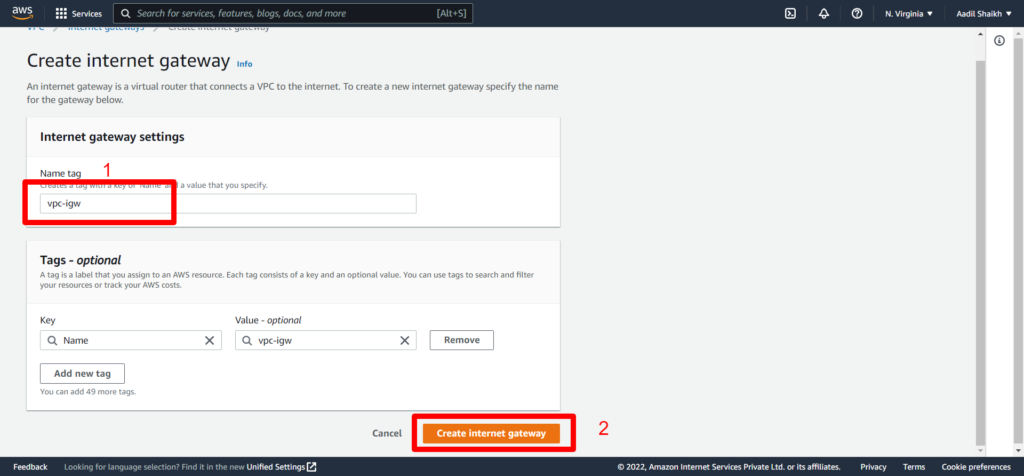

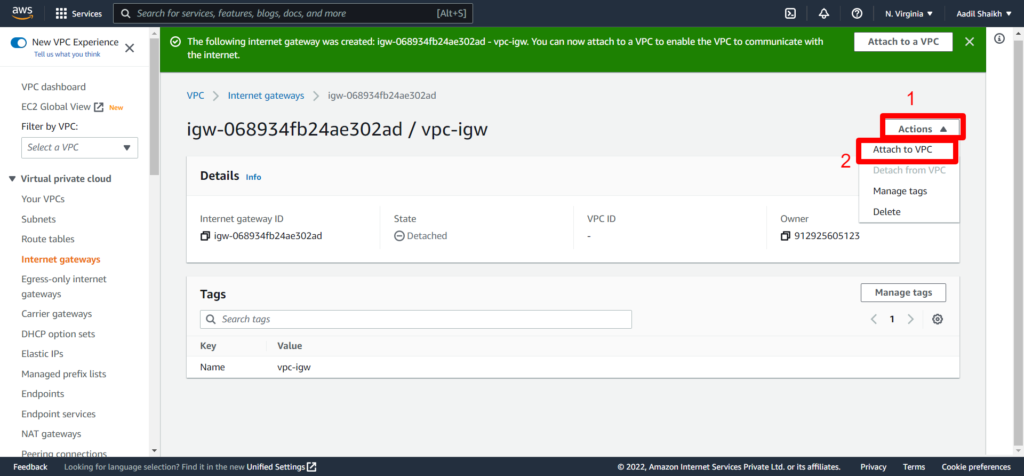

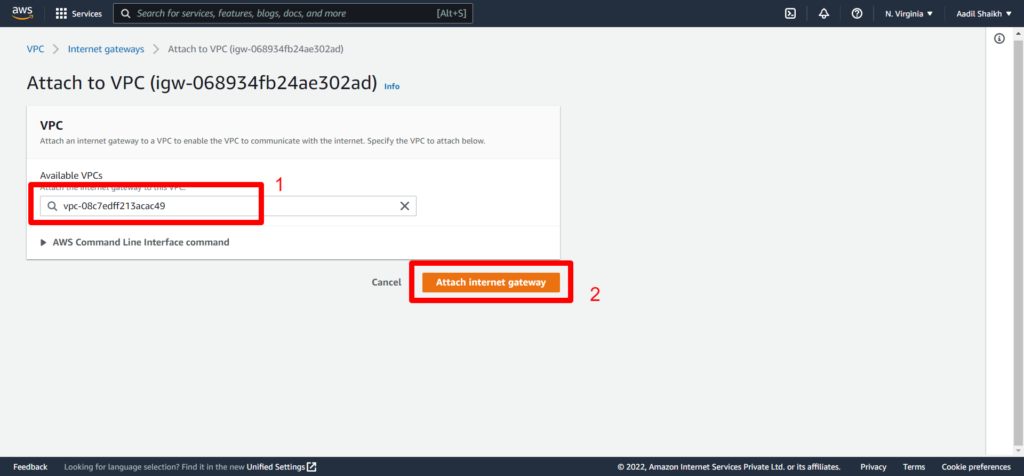

23. Now lets create a public route table as per our architecture diagram and attach it to our Public subnet. And add a public route to IGW.
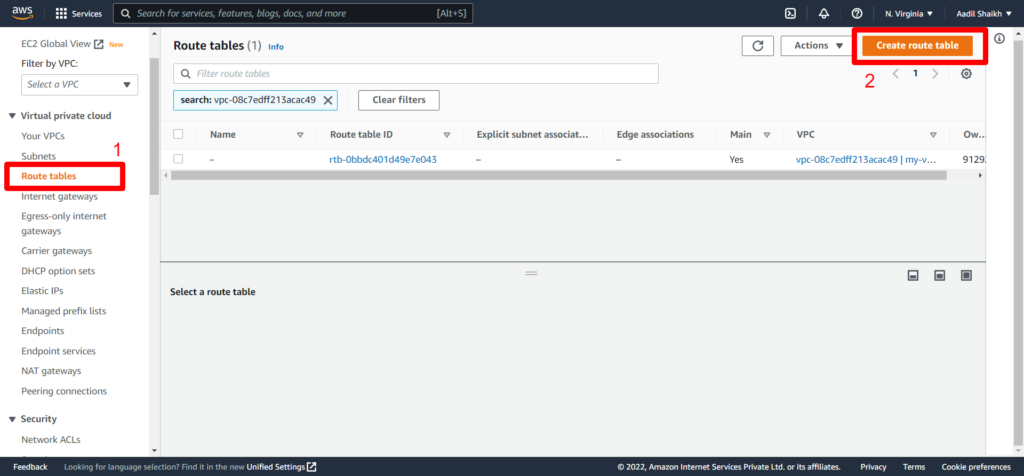

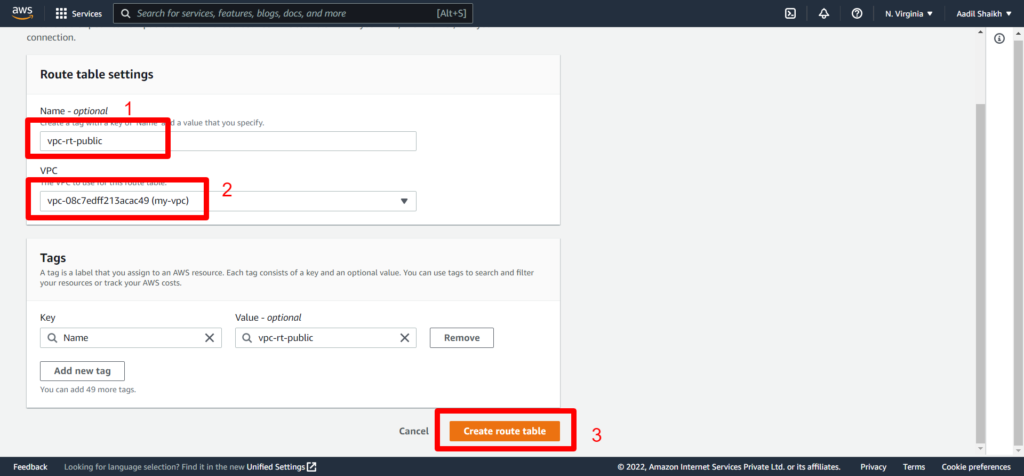

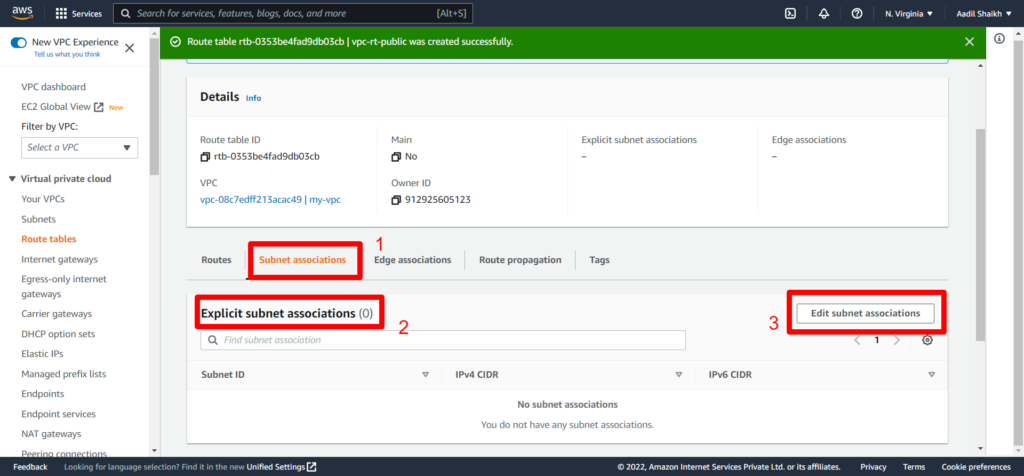

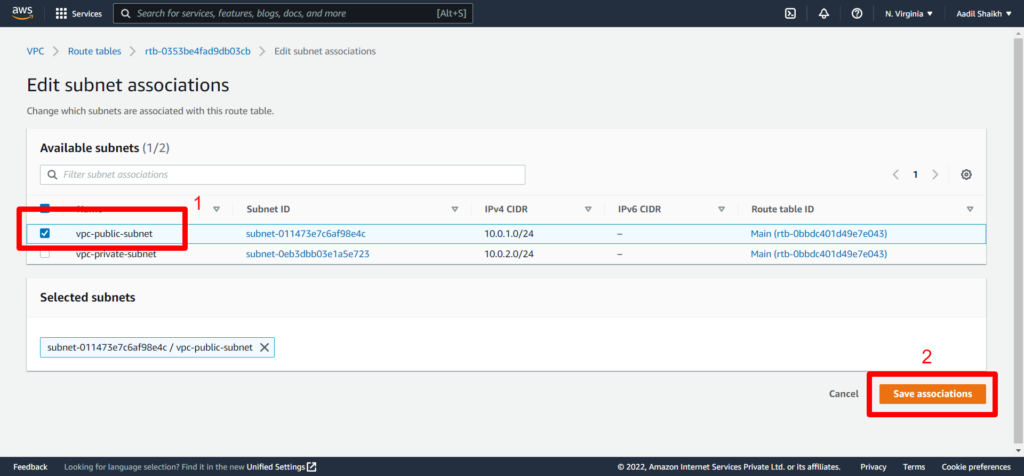

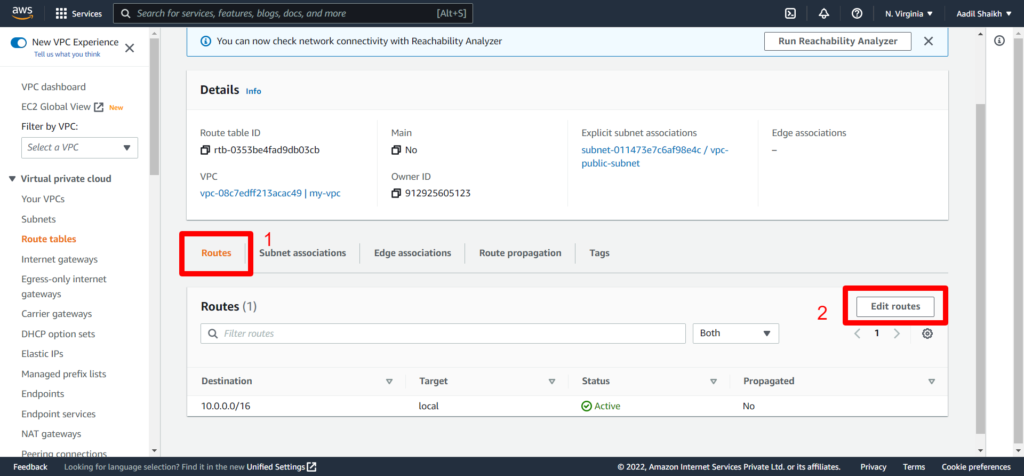

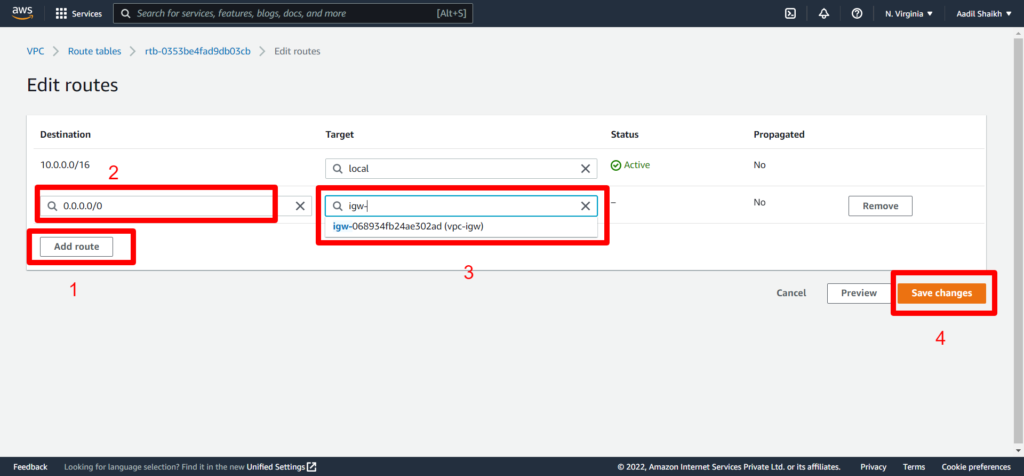

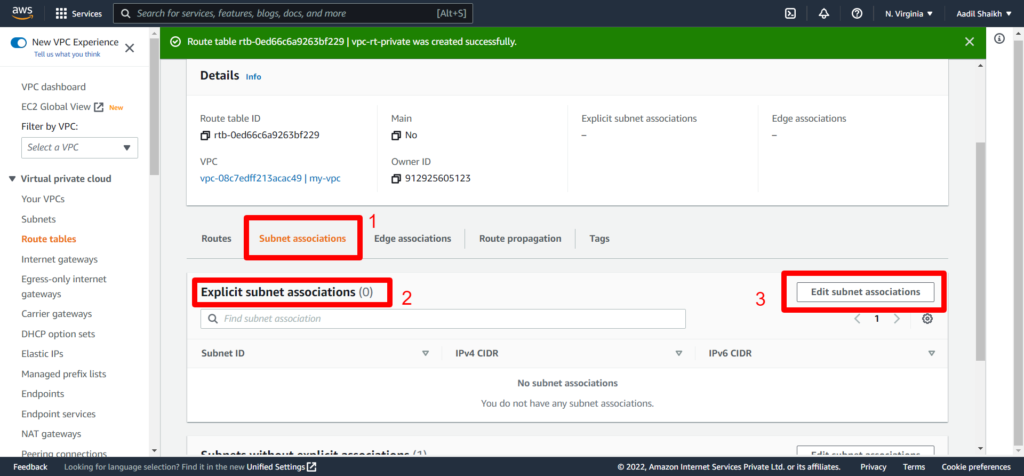
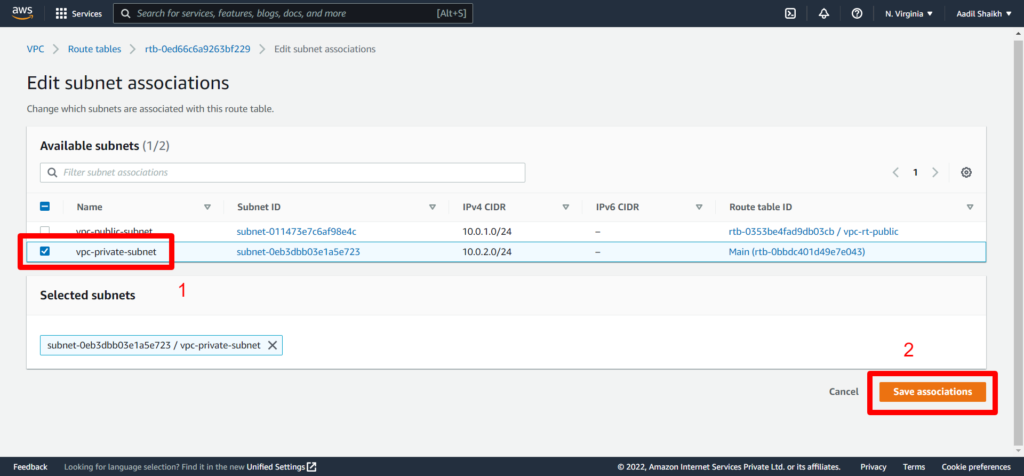
24. Similarly lets create Private Route and associate it to our private subnet. Here we will not add Public Route as this is associated to our private subnet and cannot be access by the internet and the routes will be only local/private. Follow the Screenshots
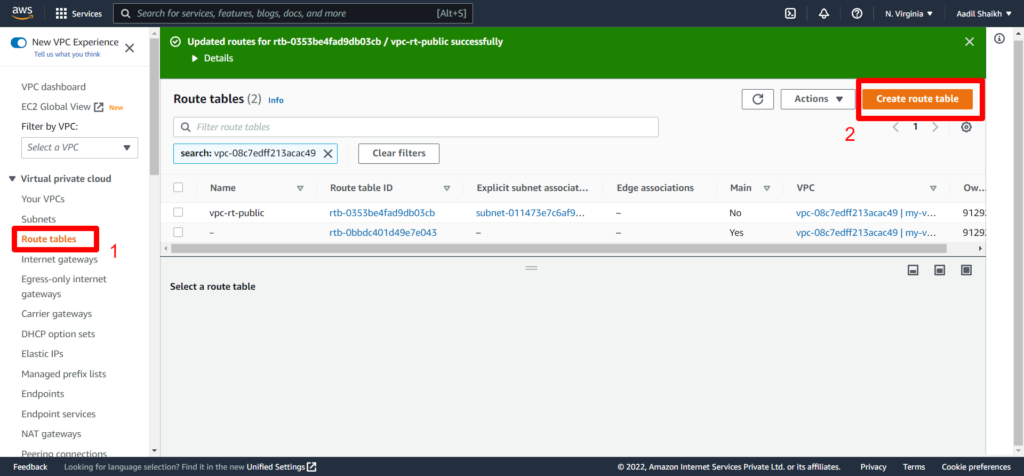

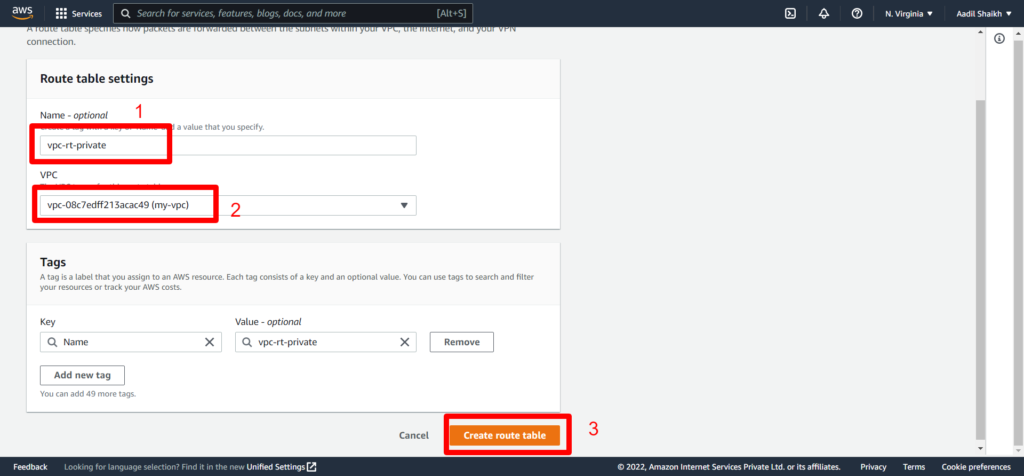



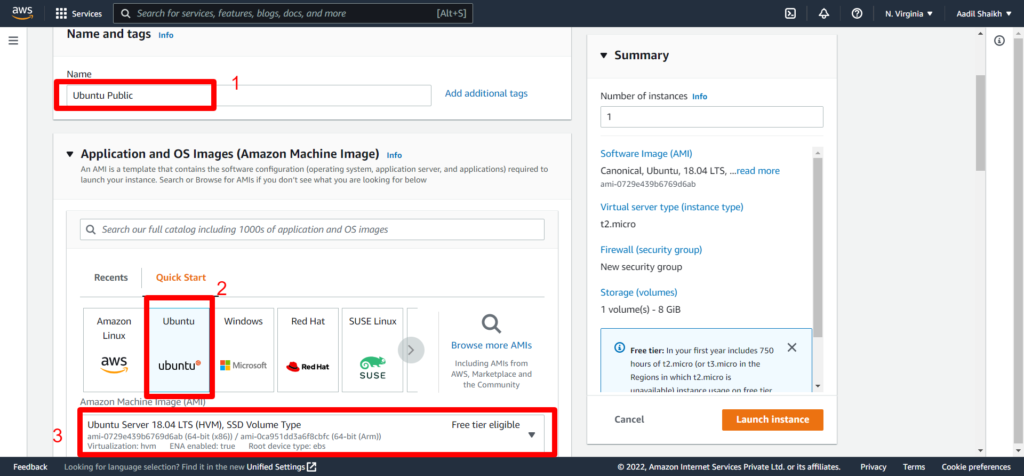
25. Now lets create an EC2 instance in Public subnet. Follow Screenshots
Go to EC2 > launch instance > Enter instance name > Select Ubuntu Server > Select key > Select my-vpc that we have created > Select public subnet under VPC > Enable auto assign IP > Create a new security Group > Enter a name for SG > Select All traffic/Anywhere > Launch Instance.

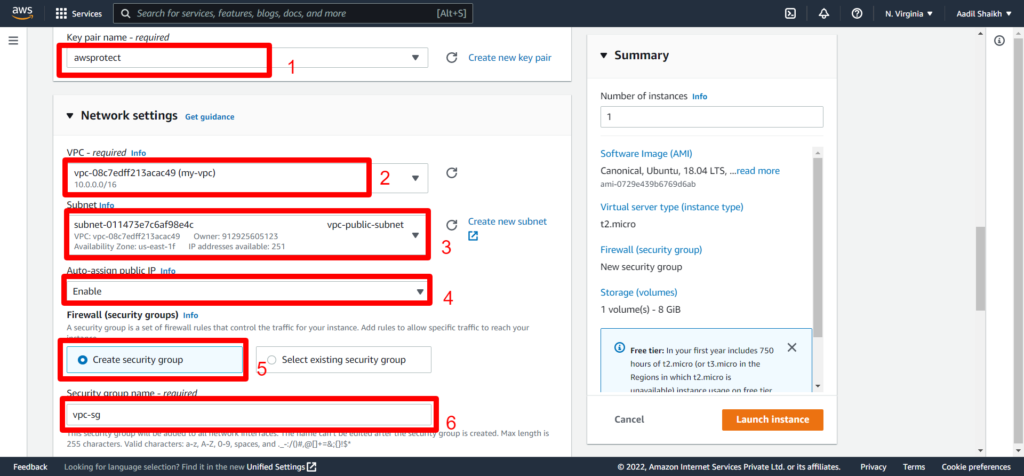

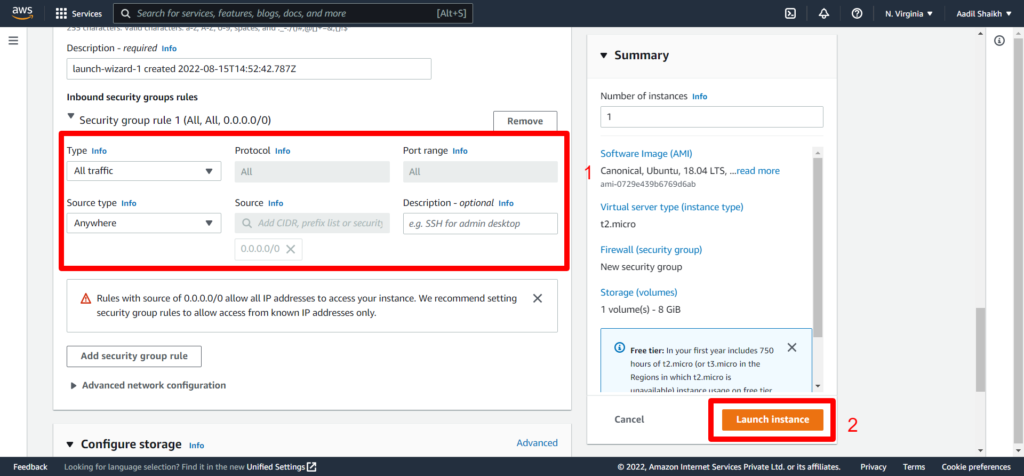

26. Now launch Private ubuntu server in private subnet.
Make sure you select the VPC created and private subnet this time. Also select the newly created security group that we have created the while launching the Ubuntu Public server.
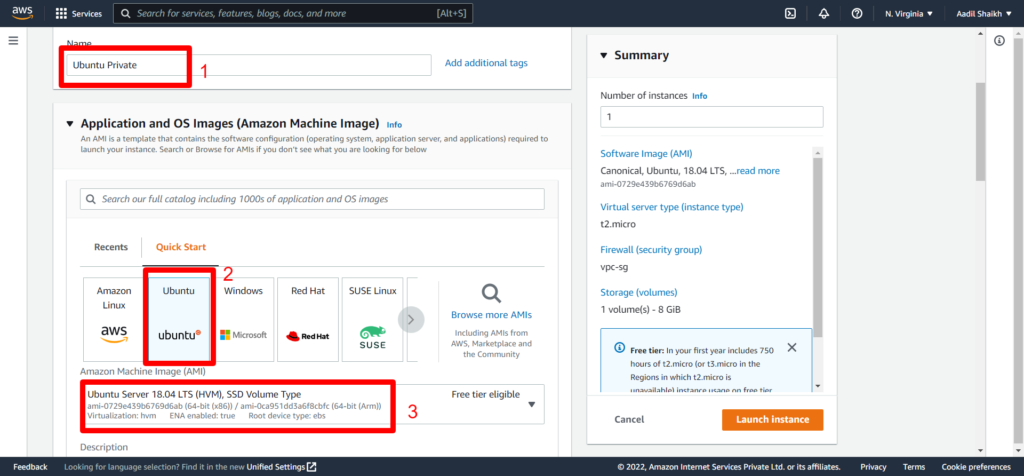

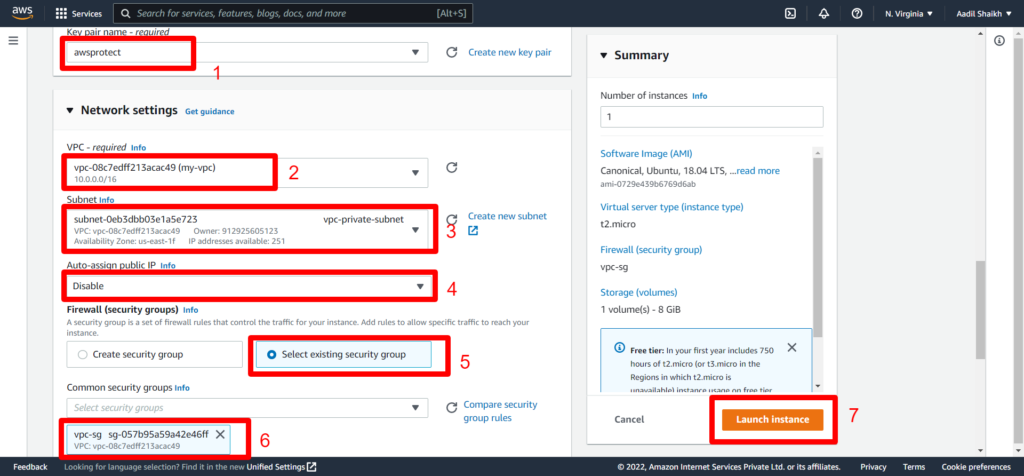

We have successfully created the Public and Private Ubuntu server in respective subnets according to our architecture diagram.
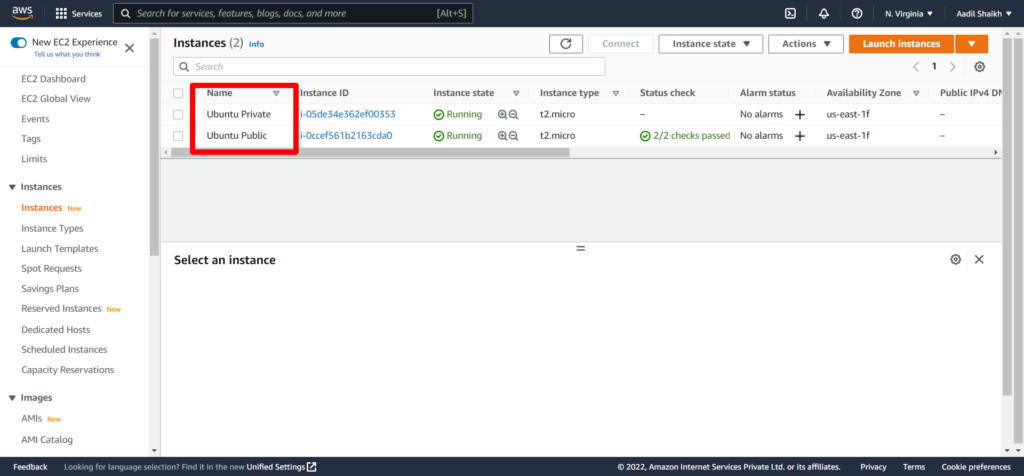

27 . Now lets connect to this Ubuntu public server and ssh into it and check if we are able to install apache web server in this instance.
As this is a public server doing ssh with public IP.
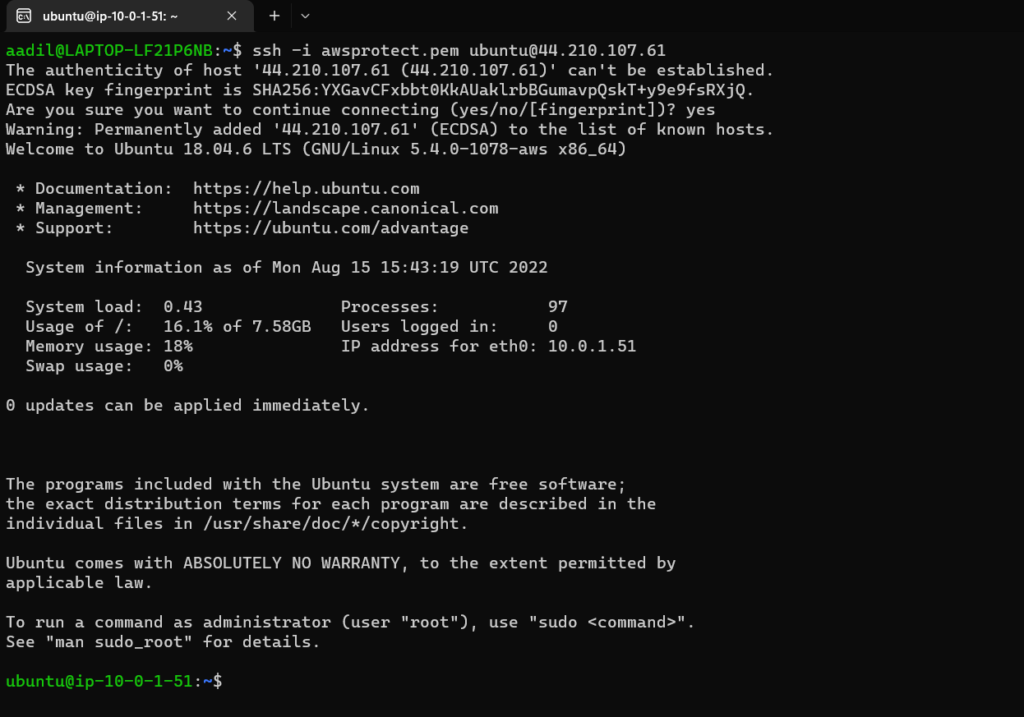

Logged in to Ubuntu Public
Now update the server and install apache web server.
$ sudo apt-get update
and
$ sudo apt install apache2 -y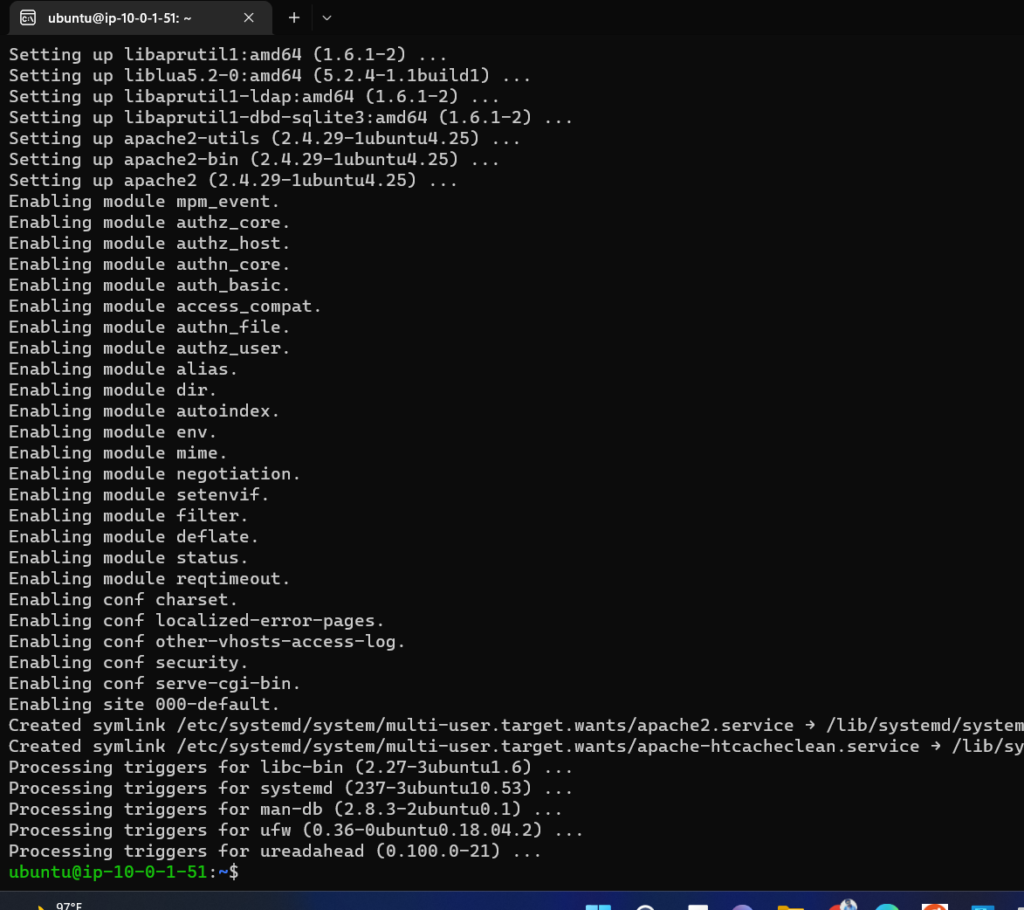

As you can see that I am able to ssh into the server and also get access to public internet to install apache web server.
28. Now lets connect to the Ubuntu Private server from the Ubuntu public server. It would look something like this:


Lets check if we are able to ssh into it and install the apache web server.
28. First copy the pem key to your Ubuntu public server with
$ scp -i awsprotect.pem awsprotect.pem ubuntu@44.210.107.61:.Use your credentials to copy.
29. Now login to Ubuntu private server with private IP from Ubuntu public server:


Try to update the server you will not be able to do that as this server is not having access to public internet. That means I will not be able to install apache as well. Check the Screenshot below:


30. Lets create a NAT gateway from VPC section. So that our private server can at least update packages from public internet.
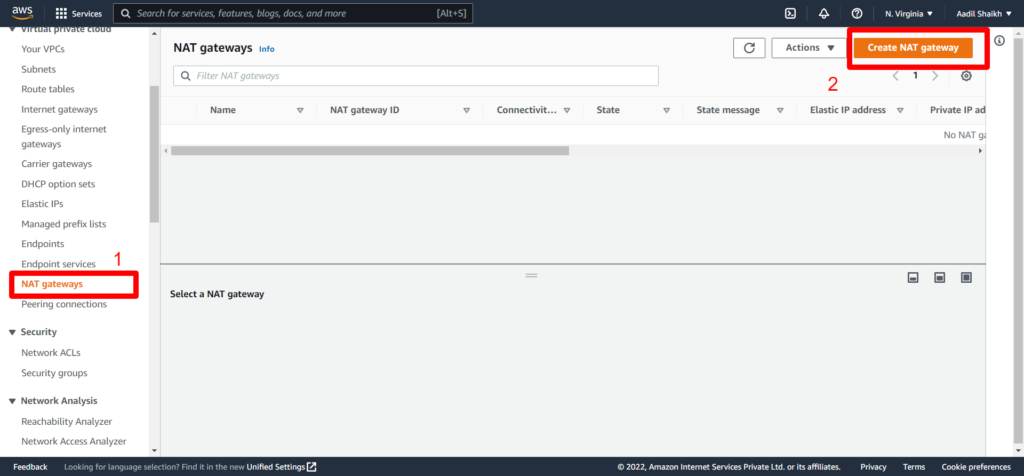

Enter a name and select our public subnet. Also allocate an elastic IP so that the NAT gateway can access the public internet and click on create.
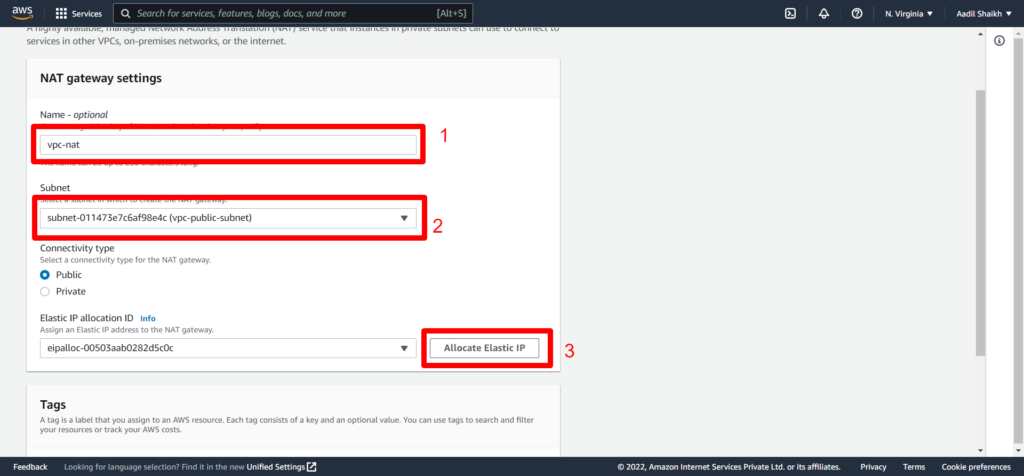

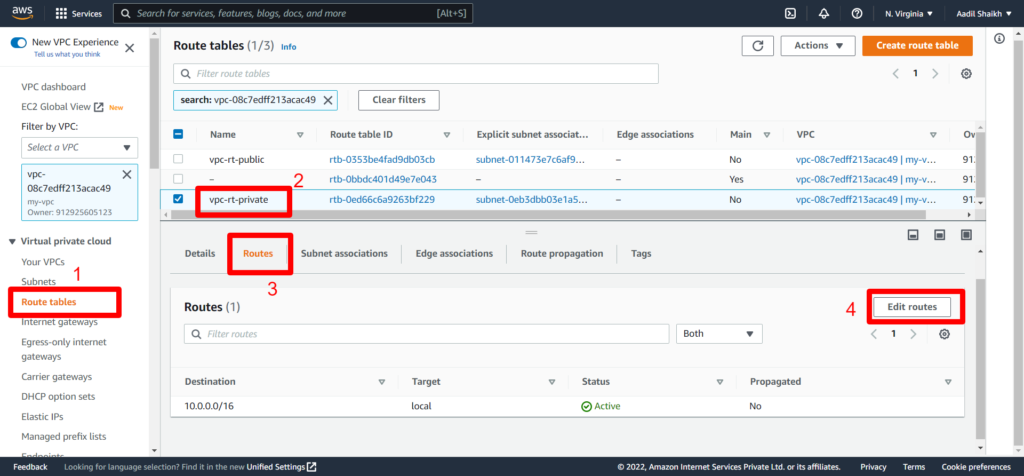
31. After creating the NAT gateway. Go to our Route Tables > select Private route table(vpc-rt-private) > Route > Edit Route.

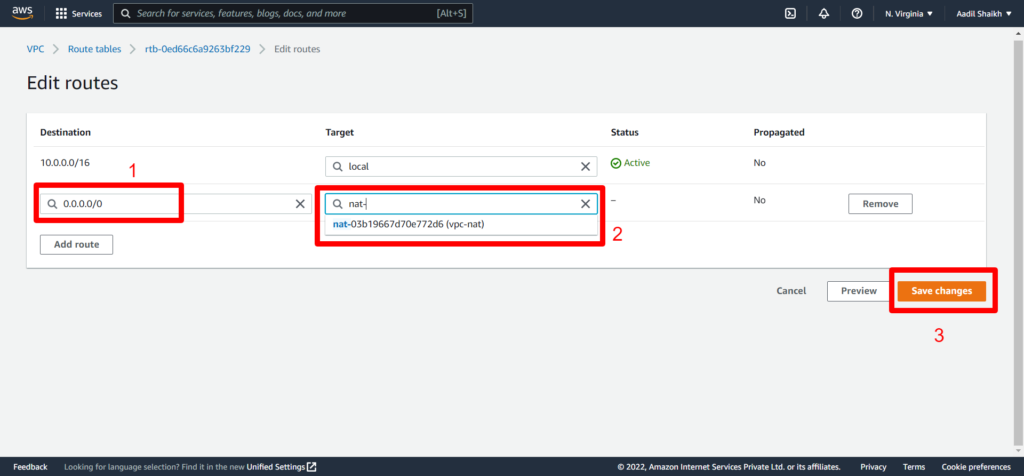
32. Enter 0.0.0.0/0 in Destination field > Select NAT gateway we created as Target > Save

33. Now we can go back to our private server and try to update and install apache web server.
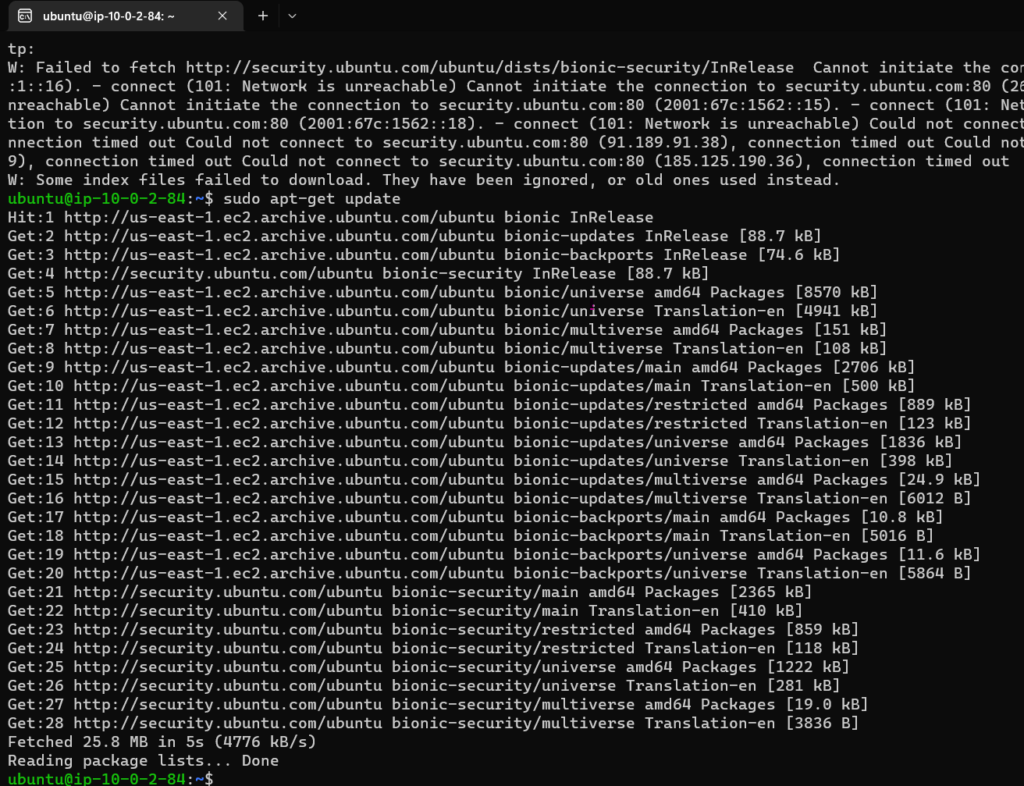

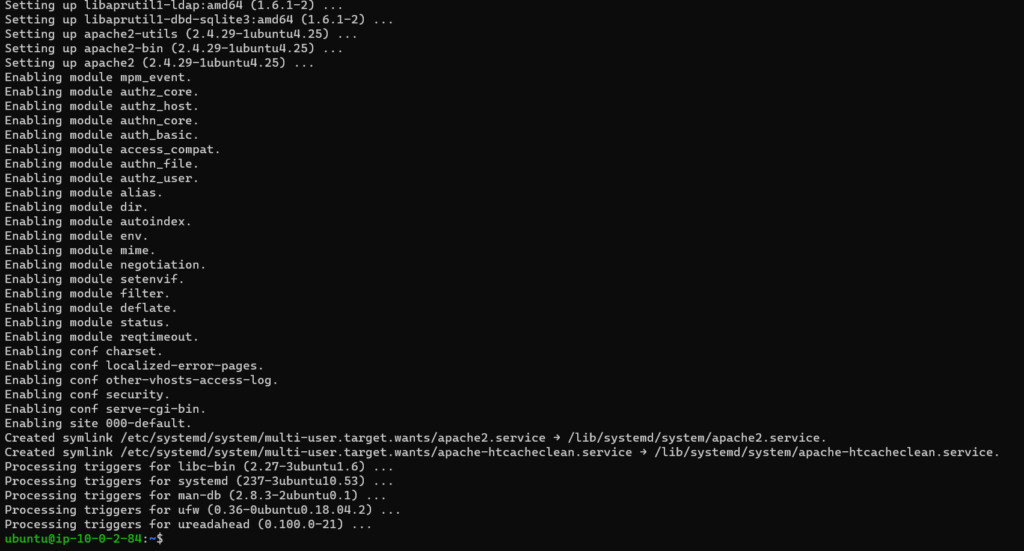

As you can see from the screenshot that I am able to update the server and also install apache web server in Ubuntu private server.
We have successfully setup VPC in AWS environment.
Note: Terminate all the resources that you have created in your AWS environment after you are done.
Happy learning!!!
You can also check other posts here.
